 IB Docs (2) Team
 Managing student accounts & mark book
The benefits of using the online mark book facility
Once you have set up the student accounts and the students have activated their accounts (see Creating student accounts) then your students can access the pages you allow so that they can work in their own time. However if you wish the student account can also be used to monitor your students' activity on the assignments you have set (see Setting assignments) and you can also use it as your mark book for any marked work you set your students, whether the assignment comes from this website or elsewhere. To illustrate how this works with some concrete, but fairly simple examples, I'll use some different types of assignments for tasks in Topic 1. We will ask students to do four different types of assignment, a quiz, some questions that require written answers, a reading activity and one of the multiple choice tests on the whole of Topic 1.
In summary:
- qBank assignments record the mark in the mark book when the student completes the quiz. If the student has several attempts at the quiz all the responses are recorded.
- In writing assignments the teacher has to review the written answer and award a mark which then appears in the mark book.
- In reading assignments, students click a 'Read' button at the bottom of the page and a tick appears in the mark book.
- Custom assignments can be used to record any marks you wish in your mark book.
How to use the mark book facility
First make sure that you give students access to any relevant pages on the website which may help them to complete the assignment - although the actual page(s) used for the assignment will give them automatic access once you send them the assignment.
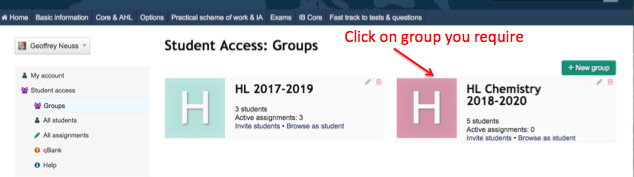
To do this first click on the Group you require in your 'Student Access"
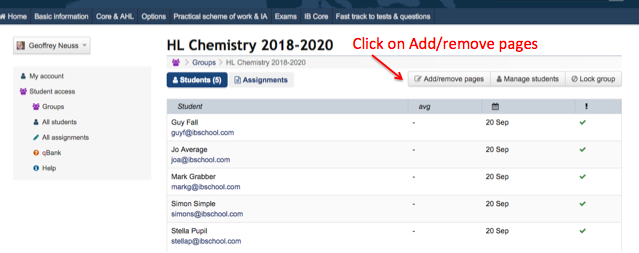
Then on 'Add/remove' pages
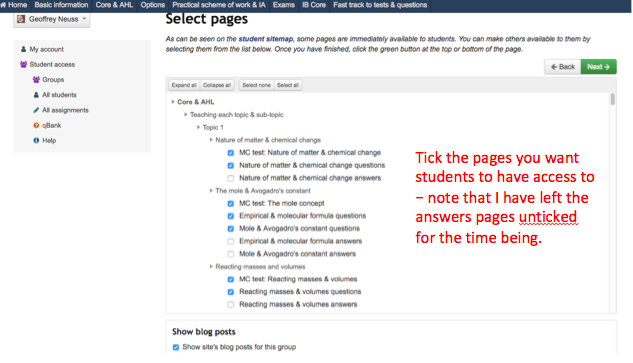
Then click on the pages you require.
Now let's look at the different types of assignments in turn.
Quiz assignments
Step 1 (Teacher)
Set up the quiz you want your students to do in your list of quizzes (see Using qBank).
Step 2 (Teacher)
Assign the quiz you want to your students see Setting assignments.
Step 3 (Student)
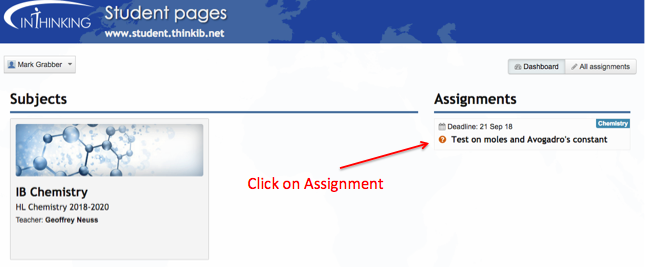
Students log in and find the assignment on their student dashboard and click on it.
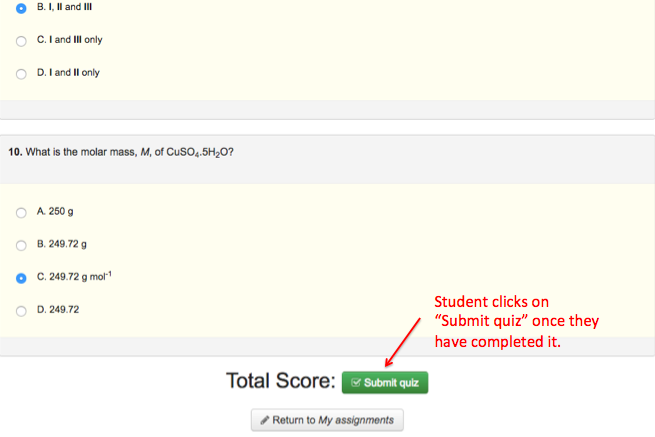
Step 4 (Student)
Student completes the assignment then clicks on "Submit quiz".
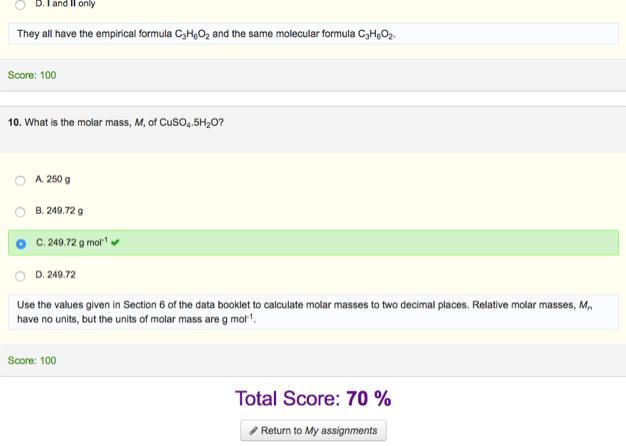
This will show the student whether or not they gave the correct or incorrect answer for each question and also gives the total score (as a percentage) which it will send automatically to the teacher. It also provides the explanation to each question whether or not the student got it correct (i.e. gave the best answer) or incorrect.
Step 5 (Teacher)
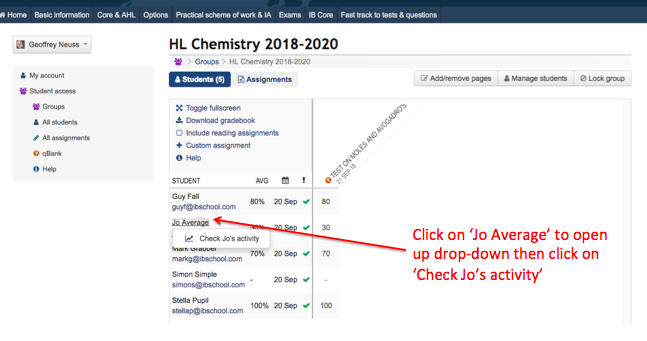
Go to Group in Student Access and select the relevant group.
Step 6 (Teacher)
Check all students' activity.

This shows that so far four of the five students have completed the quiz and lists their percentage marks.
Step 7 (Teacher)
Identify a particular student's activity that you want to check.
You can check the individual performance of any student by clicking on their name. For example, you may be concerned that Jo Average only scored 3 out of 10 (i.e. 30%) on this test. So click on Joe Average. This will produce a drop-down menu which you can then click on.
Step 8 (Teacher)
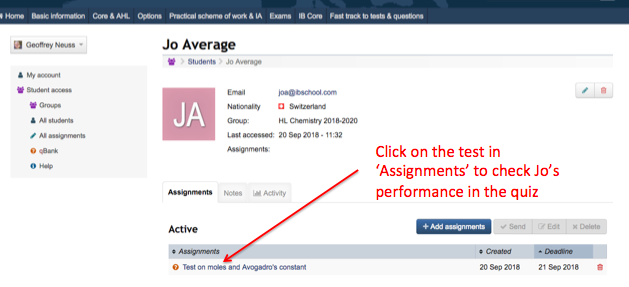
Identify the assignment that you want to check for that student.
Step 9 (Teacher)
Find detailed information about the student's activity.
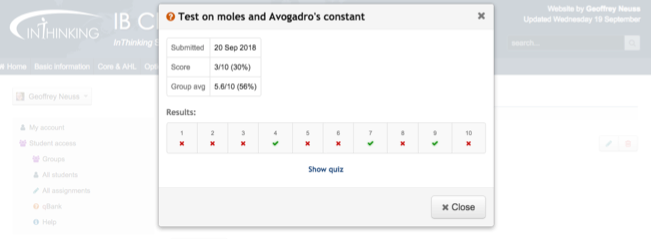
This tells you the date Jo did the quiz, his score, how his performance compared with the other students in the group and also how he performed on each individual question.
Writing assignments
For chemistry you are most likely to use these when you want students to answer short-answer questions. You can of course just direct them to the question page and ask them to complete their written answers by a particular date. You would then have the option of collecting their answers in and marking them or simply providing them with the answers after the hand-in deadline and letting them correct their own work. However if you set it as an assignment you can monitor their work and also record the marks in your online mark book. Let's do this for some of the short-answer questions on the mole and Avogadro's constant.
Step 1 (Teacher)
Set up the writing assignment by accessing your Group, then "Assignments" then "+Add assignment". Select "writing assignment" and complete the boxes. Note that you will need to add a minimum and maximum amount of words that your students can use. You may have to verbally tell them that they will not be able to use subscripts or superscripts when writing their answers so they would have to write sulfuric acid as H2SO4 and Avogadro's constant as 6.02 x 10^23 mol^-1 etc.
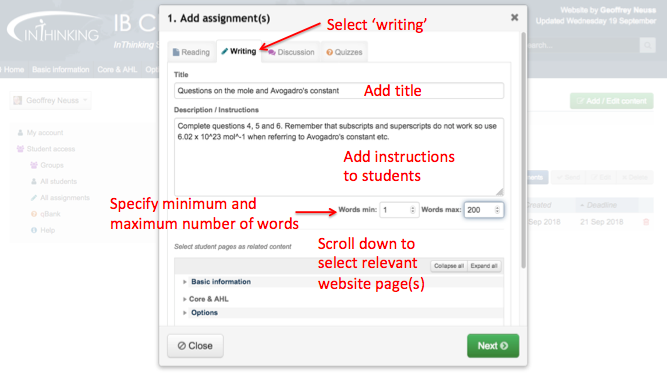
You will need to scroll down the open box to select the webpage(s) you want your students to refer to.
.png)
Step 2 (Teacher)
Set the deadline then send the assignment to all the students in the group.

Step 3 (Student)
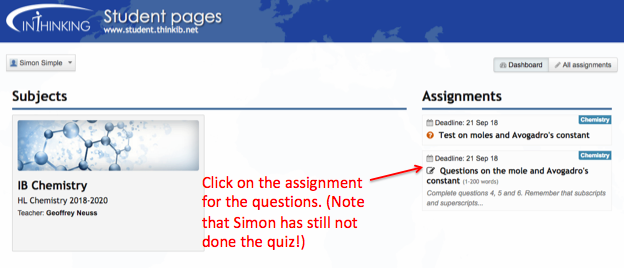
Each student logs in and finds the assignment on their student dashboard and then clicks on it.
Step 4 (Student)
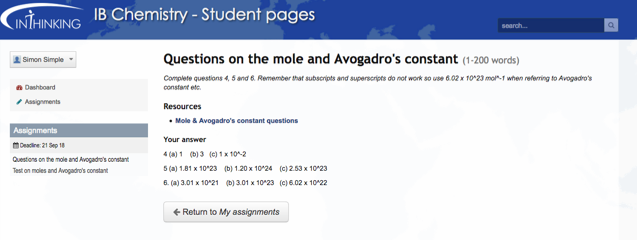
Each student finds the relevant webpage or resource with the questions, reads the instructions, writes his/her answers and then clicks on "Submit task".

Step 5 (Student)
Once they click on "Submit task" the page opens with a summary of the task and their answers
Step 6 (Teacher)
The teacher goes to the relevant group, clicks on the student, clicks on "student activity' from the drop-down menu and then clicks on the relevant assignment.
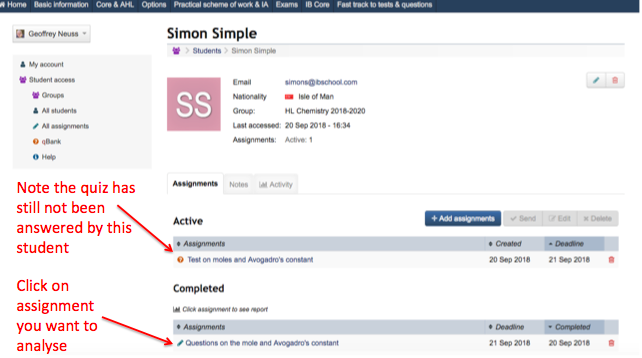
Step 7 (Teacher)
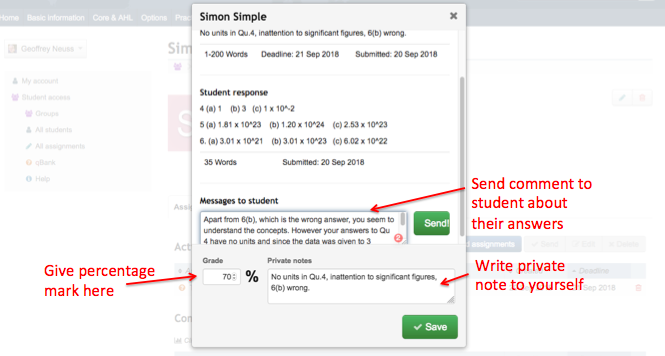
The teacher marks the assignment awarding it a percentage mark, writes any necessary comments to give feedback to the student as well as a private note to himself or herself if required, then clicks on "Send" and "Save" when completed.
Step 8 (Teacher)
The teacher repeats this process for all the students in the group, then clicks on the relevant group to open up the mark book.
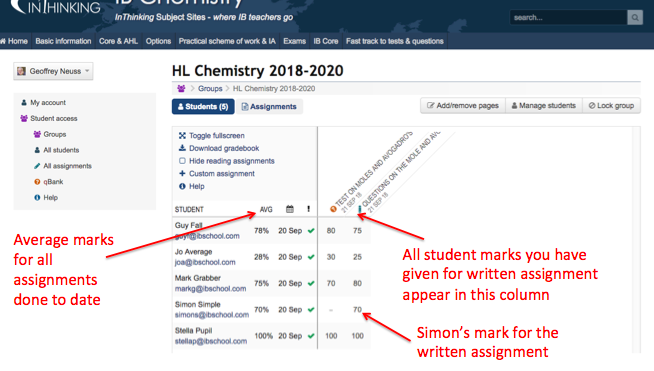
This shows all the marks for each student for the assignment and also the average mark for all the marked assignments to date.
Step 9 (Student)
Meanwhile each student can log onto their dashboard, click on "All assignments" and see what mark they received. If there is an envelope by the assignment they can click on it to see the feedback from the teacher.

Step 10 (Student)
Student reads feedback and can reply to the teacher if he or she wishes.
.png)
Reading assignments
You may wish to give the students some pages just to read and, if you wish, you can monitor their actions. Most likely you will use this to give them access to the answers to short-answer questions after they have completed their written assignment. The answers are fully worked answers so they can learn from any mistakes they have made. If they still cannot understand where they have gone wrong then they can discuss with other students or ask you for help directly. For this example they will be provided with the answers to the short-answer questions on moles and Avogadro's constant that was set above as a writing assignment.
Step 1 (Teacher)
Identify the group you wish to set the assignment for and set the writing assignment as explained in Setting assignments. Set the deadline and send the assignment to all the students in the group.
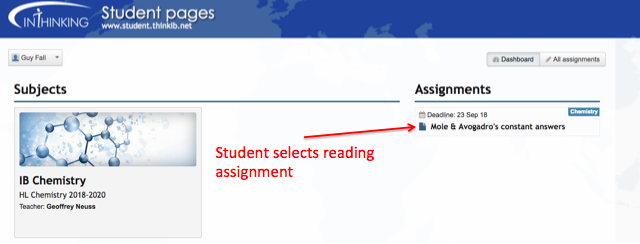
Step 2 (Student)
The student logs in and clicks on the assignment.
Step 3 (Student)
The student reads the assignment paying attention to any instructions given then clicks on "Read".
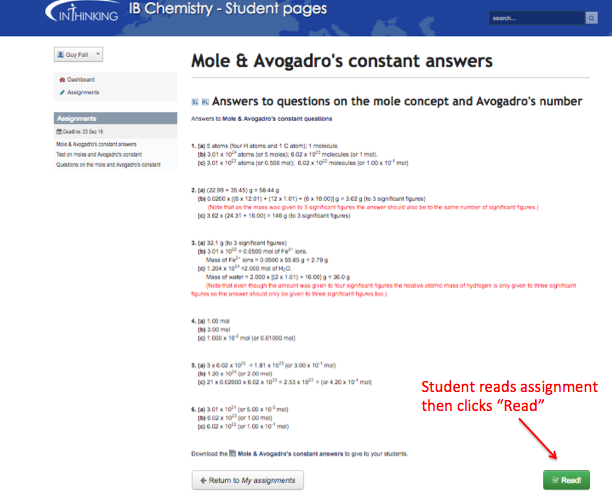
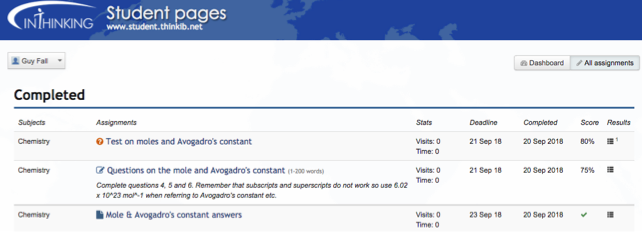
After clicking on "Read" the page opens on All assignments showing the student that he/she has completed all three of the above assignments set by the required deadlines.
Step 4 (Teacher)
The teacher selects the relevant group to open the mark book. This may open first in the default mode where only the marked assignments show.

Click on "Hide reading assignments" to open the reading assignments columns

The ticks in the column shows that all students have read the assignment.
Step 5 (Teacher)
To monitor an individual student, click on their name (e.g. Guy Fall), then click on "student activity" from the drop-down menu.
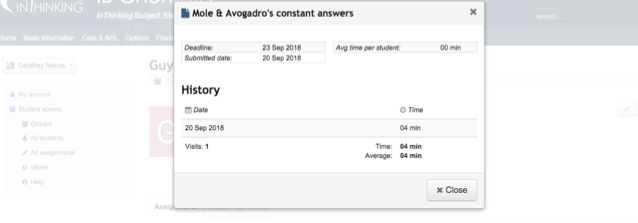
This will tell you when the student did the reading assignment and how long he/she spent on it.
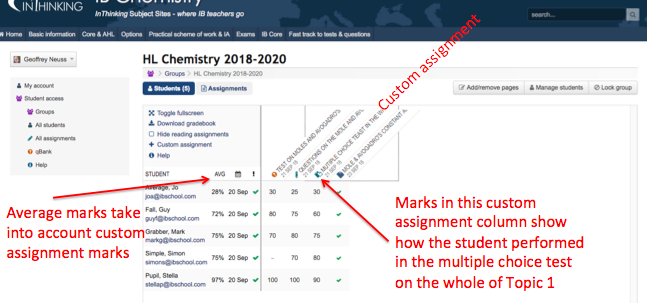
Custom assignments
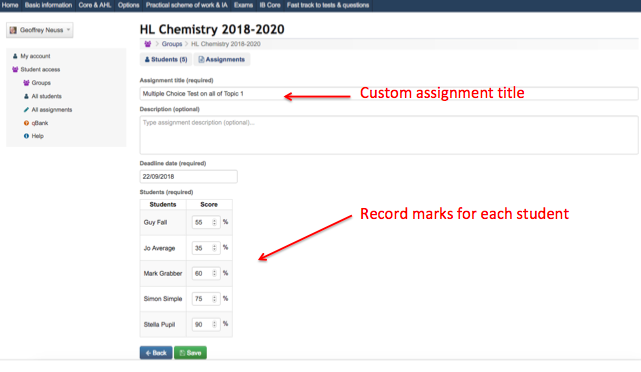
'Custom assignments' is a really useful facility to record marks in your mark book which have not come from automatically recorded assignments. For example they may be the results of tests, homework from questions not on this website or practicals etc. When you open up your mark book with the list of students in the group simply click on "Custom assignments".

Let's suppose that after teaching Topic 1 you give your students one of the multiple choice tests on Topic 1 that can be found in Multiple choice tests for each topic. These are not the same as the quiz questions so are not recorded automatically. If you mark the test it is easy to record the mark for each student in the custom assignment.
Once you click on "Save" the results will appear in your mark book alongside all the other marked assignments.
You can see that you can now build up your online mark book to cover the whole of the two year course. At any time you can download and print the mark book using the menu above.
 Twitter
 Facebook
 LinkedIn